The authorization process not only allows for syncing of your iPhone or iPad data with the iTunes app for PC but also allows easy accessibility. Another important fact to note is that there is a limit to the number of computers that have the authorization to view your iTunes purchases. The limit is five computers. In a situation where you would like to authorize a sixth computer, you must deauthorize any of the previously authorized computers. Here’s how to do so:
How to Authorize a Windows PC Using iTunes
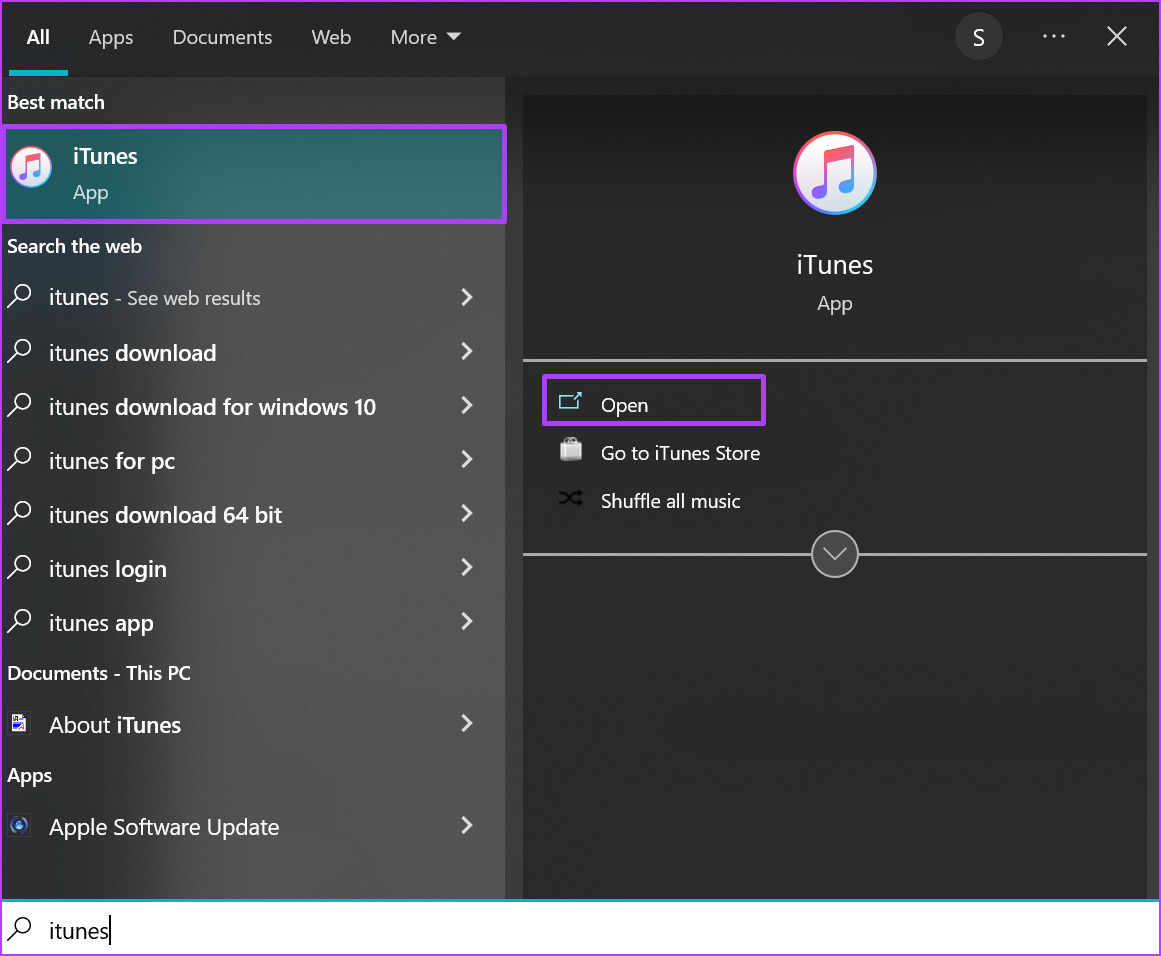
Authorizing a Windows PC to view your iTunes store purchases requires updating your account settings. Here’s how to authorize a Windows PC to view your purchases: Step 1: On your PC, click on the Start menu and search for iTunes.
Step 2: Click on Open to launch the iTunes app from the results.
Step 3: At the top of the iTunes window, click on Account.
Step 4: Check that you are signed in to your Apple account. If you aren’t already signed in, click on Sign In and provide your Apple ID and password.
Step 5: Click on Account again and select Authorizations.
Step 6: Click Authorize This Computer.
Step 7: On the Authorize This Computer dialog box, provide your Password and click on Authorize.
Upon successful authorization of your computer, you should get a pop-up box stating the number of PCs with authorization.
How to Deauthorize a Windows PC Using iTunes
The process of deauthorizing a Windows PC from viewing your iTunes store purchases is quite similar to the authorization process. Here’s how to deauthorize your Windows PC: Step 1: On your PC, click on the Start menu and search for iTunes.
Step 2: Click on Open to launch the iTunes app from the results.
Step 3: At the top of the iTunes window, click on Account.
Step 4: Check that you are signed in to your Apple account. If you aren’t already signed in, click on Sign In and provide your Apple ID and password.
Step 5: Click on Account again and select Authorizations.
Step 6: Click Deauthorize This Computer.
Step 7: On the Deauthorize This Computer dialog box, provide your Password and click on Deauthorize.
You should get a pop-up message stating whether the deauthorizing was successful.
How to Deauthorize Multiple PCs Using iTunes
Remember that iTunes only allows you to authorize five PCs to view your iTunes purchases. When you cannot quite remember PCs you have authorized or have access to, there is a workaround to deauthorize them from iTunes. However, there exists a caveat to using this option: you can only use this feature once a year. Here’s how to access it: Step 1: On your PC, click on the Start menu and search for iTunes.
Step 2: Click on Open to launch the iTunes app from the results.
Step 3: At the top of the iTunes window, click on Account.
Step 4: Check if you are signed in to your Apple account. If your Account information does not show, click on Sign In and provide your Apple ID and password.
Step 5: Click on Account again and select View My Account.
Step 6: On the Account Information Page, click on Deauthorize All.
Step 7: Click on Deauthorize All on the dialog box to confirm your action.
You should get a pop-up message stating that all PCs with previous access no longer have authorization. You can start the authorization process again using the previous steps explained.
Updating the iTunes App on Windows
If you cannot authorize or deauthorize your PC to view your iTunes purchases, it might be because your iTunes app is not up to date. There are several ways you can update the iTunes app either through iTunes directly or the Apple Software Updater to name a few. You can try uninstalling and reinstalling the iTunes app if it still doesn’t work. The above article may contain affiliate links which help support Guiding Tech. However, it does not affect our editorial integrity. The content remains unbiased and authentic.