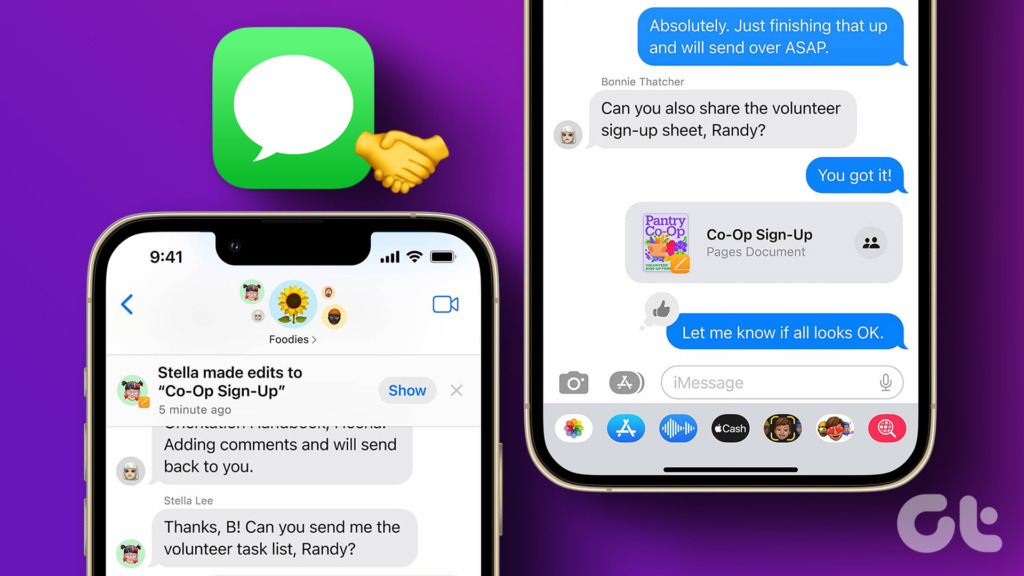
But what is project collaboration in Messages? As the name suggests, it allows users to collaborate, i.e., view, access, edit, and manage files, folders, notes, reminders, and more, through Messages. Though how exactly does that work? Well, that’s what we’re here to tell.
Requirements to Use the Collaboration Feature in Messages
To start collaborating on a project with Messages, all participants should have,
An active iMessage account on their device. At least one of the following devices: iPhone running iOS 16 or later. iPad running iPadOS 16 or later Mac running macOS Ventura or later.
Furthermore, the content i.e., the file or folder you want to share should be saved on a drive or location to which every participant has access, for instance, iCloud Drive.
Which Apps Support Collaboration on Projects With Messages
You can use the following apps to create and share documents, notes, spreadsheets, reminders, presentations, Tab Groups, folders, files, and more.
Reminders Notes Freeform Safari Keynote Numbers Pages iCloud Drive
However, before you can use any of these apps for collaboration, you should enable their iCloud access.
How to Enable Collaboration Features for Apps
Step 1: Launch Settings → tap your name. Step 2: Select iCloud. Step 3: If you’re using iPhone or iPad, tap Show All to view all apps that have iCloud access. Step 4: Ensure the iCloud sync for the app is turned on.
How to Initiate Collaboration With Messages on iPhone and iPad
The first step for collaborating on a project is to invite other users, i.e, share the file with collaboration enabled. Now, you can either send the invite from iPhone, iPad, or via Mac (as long as the Messages sync is turned on). Step 1: Launch the app and select the file you want to collaborate on. Step 2: Tap the Share icon to Collaborate. Step 3: In the Share Sheet, tap the Collaborate/Send Copy bar under the file’s title and ensure Collaborate is selected. Step 4: Next, tap the sharing permission settings below the Collaborate bar. Step 5: Enable/disable the permissions as per your choice and tap Done. Step 6: Now, you can select the suggested users from the Share Sheet or tap Messages. Step 7: Select the individual or group you want to send the invite to. Step 8: Once the conversation opens with the collaboration link, add a note (if required) and tap the send icon. Alternatively, you can drag and drop the project from the File app to the conversation in the Messages app. However, before you start interacting, the participants must accept the invitation and join the shared project. Note: People collaborating on the project may be different (in number) from the people in Messages collaboration. As you might have invited some people outside Messages or invited them in different conversations or they simply don’t use iMessage.
How to Collaborate on Projects in Messages On Mac
There are two ways to start collaborating in Messages on your Mac.
Method 1: Send Invites From the Corresponding App
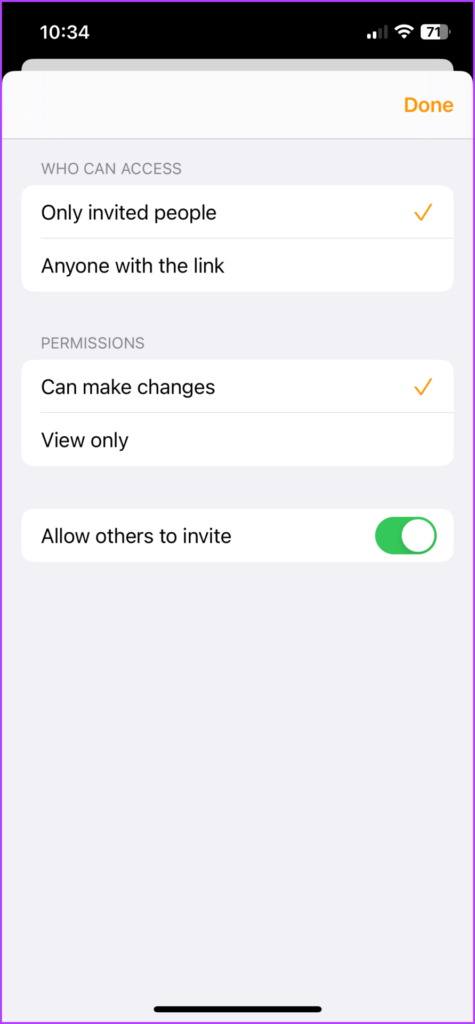
This one’s similar to the iPhone/iPad method. Notably, the process of sending collaboration invites might vary as per the app in use. Though, the overall approach is the same. Step 1: Open the file you want to share and collaborate on. Step 2: Look for the Share button and click it. Step 3: Ensure Collaboration is selected from the Collaborate/Send Copy bar. Step 4: Click the > arrow in the pop-up menu to adjust sharing permissions. Here, you can manage,
Who can access. Permissions. Check/uncheck ‘Allow others to invite’.
Method 2: Drag and Drop the File into the Messages App
Before starting, ensure that the file/folder you’re sharing is on the iCloud drive. Step 1: Launch Messages and open the conversation with the individual or group you want to invite. Step 2: Next, drag and drop the file/folder from Finder or desktop. Step 3: In the message field at the bottom, click the Collaborate/Send Copy bar under the file’s title and select Collaborate. Step 4: Click the > arrow below the Collaborate bar to manage sharing permissions. Tip: You can also add a comment to send along with the invite. Step 5: Press Return (enter) to send the message. Once the project is shared, you can see the activity updates at the top of the conversation when someone makes an edit.
Manage a Collaborated Project Using the Messages App
While you can check out the progress and manage the shared project from the associated app, it can also be done through iMessage.
1. Open the Project
You can either launch the app and open the shared file or go to the Messages app and open the conversation.
On iPhone: Tap the project or tap the individual or group’s name from the top → scroll down to Collaboration → select the project.
On Mac: Tap the project directly or tap the ‘i’ icon → scroll down to Collaboration → select the project.
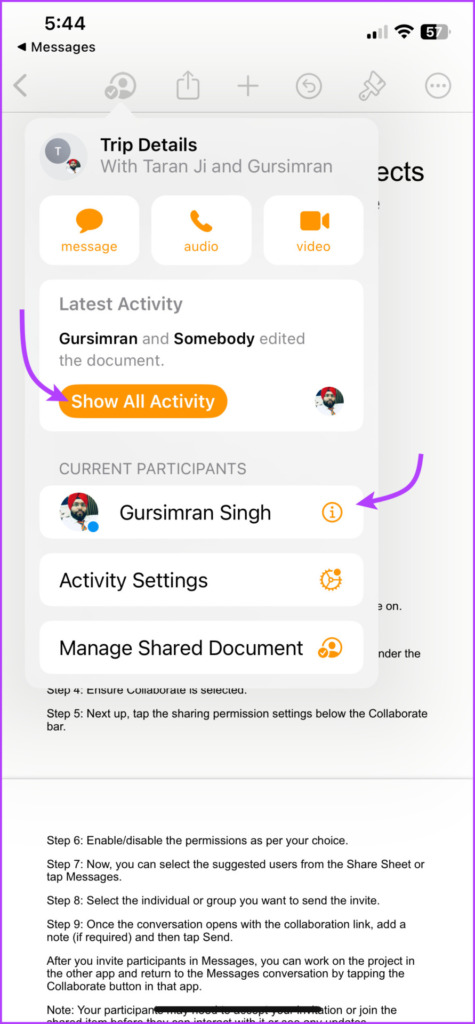
2. See Project Activity
In Messages: Tap/click Show or Review. It will pop up at the top of the conversation whenever someone makes an edit.
In the project: Tap or click the collaborator icon → select Show All Activity.
Note: If a participant is currently active, you’ll see their recent activities under the Current Participants section.
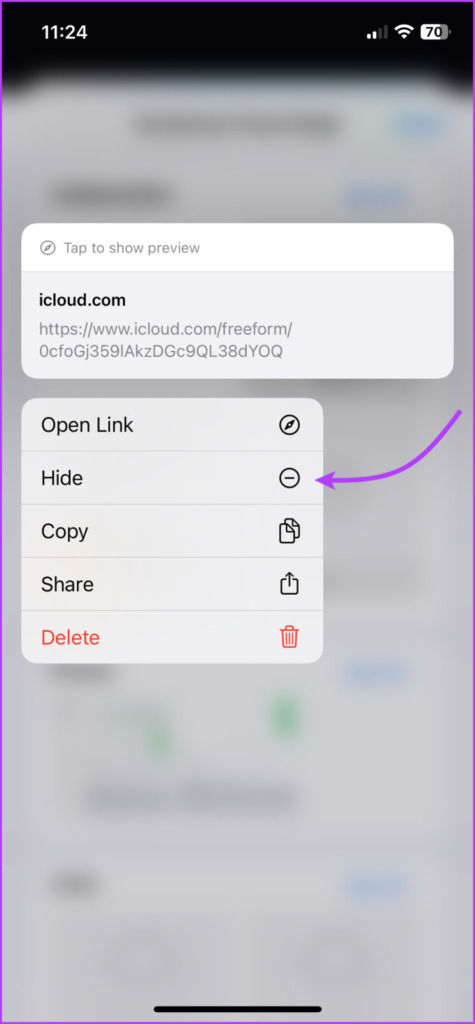
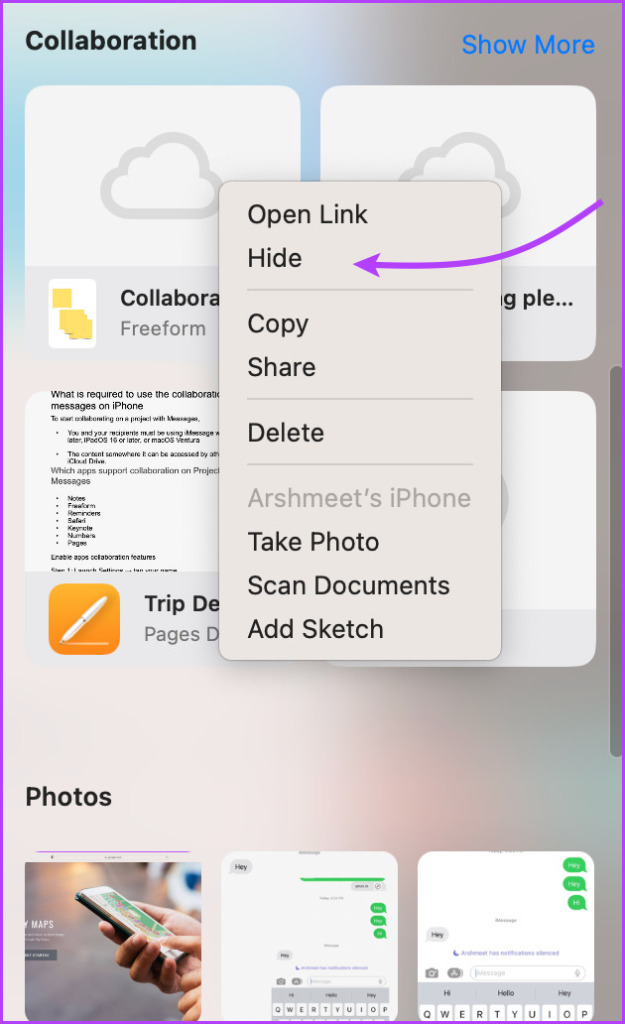
3. Hide a Project
A hidden project won’t show up in the Collaboration section. However, it will continue to appear in the Links section. Hiding doesn’t remove the collaborator or affect sharing preferences; it’s just a way to organize a completed project. Also, note that you can’t unhide a project. So, use the feature wisely.
On iPhone: Open the conversation → tap the person/group’s name from the top → scroll to Collaboration → long-press the project → select Hide.
On Mac: Open the conversation → click the i icon from the top-right corner → scroll to Collaboration → Control-click or secondary click the project → click Hide.
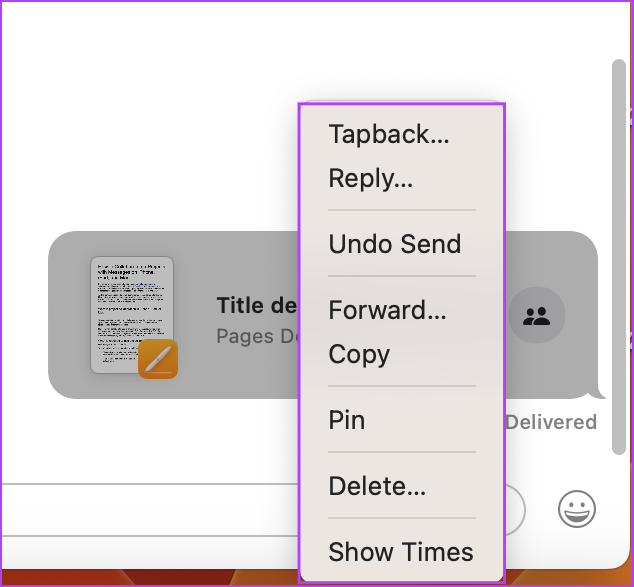
4. Pin or Delete the Project
The collaboration link acts as a regular message. So, you can tapback, reply, forward, pin, unsend, or delete it. Simply long-press or control-click the conversation and select the preferred option. Although, deleting or unsending the message won’t stop the sharing; just the conversation will not be associated with the collaboration, i.e., you won’t receive updates on Messages.
How to Manage Participants When Collaborating in Messages
Things get a bit complicated from here onwards. While you can add or remove participants from the conversation and even forward/share the project, the sharing preferences can’t be changed through Messages. You can only add or remove participants from the project using its corresponding app.
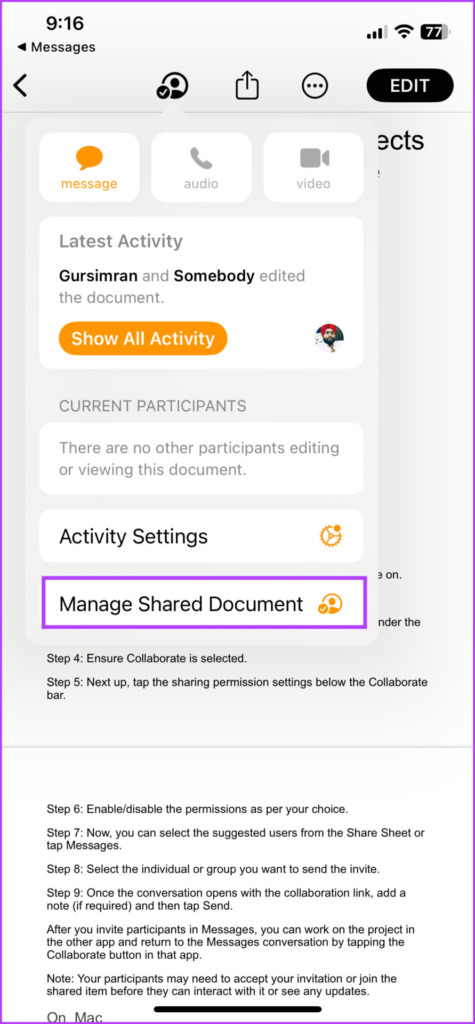
1. Manage Sharing Preferences
In the corresponding app, open the project. Next, tap/click the collaborator’s icon and select Manage Shared Document. Now you can, I. Add collaborators:
Tap/click ‘+ Share With More People’ and invite collaborators. Tap/click Copy Link to share the link directly with an individual or group.
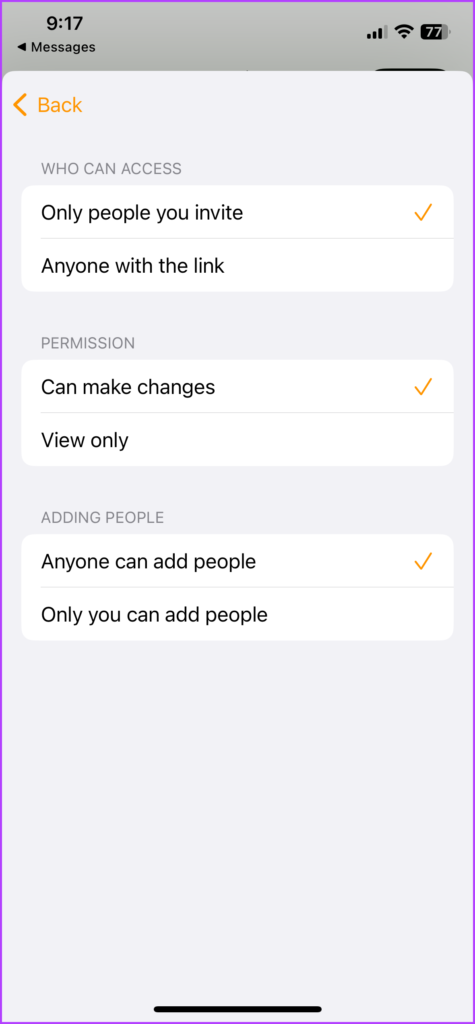
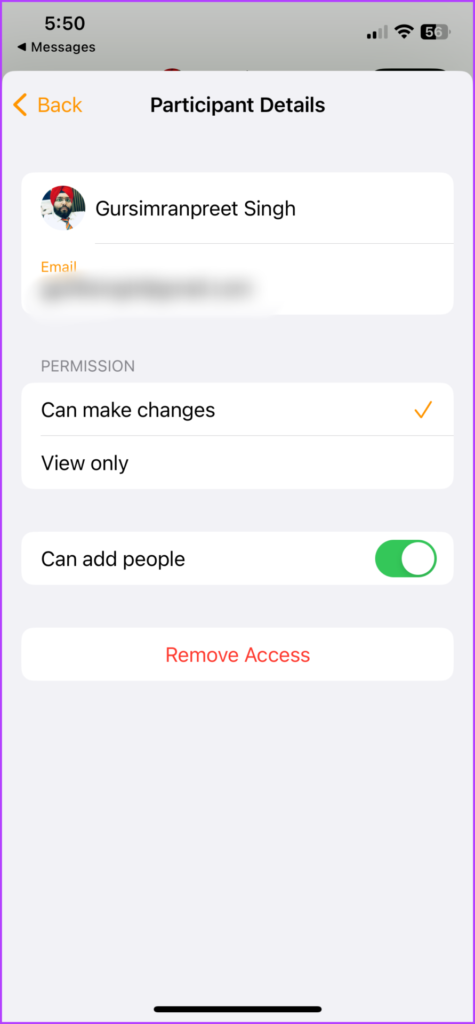
II. Change sharing permissions: Tap Share Options on iPhone/iPad. On Mac, you can view it under the Permissions sections. Here you can select any of the options shown in the screenshot. III. Manage share permissions of individual collaborators: Tap the collaborator’s name to view the participant details. Here, you can
Manage permissions, select either: Can Make Changes. View only. Toggle on or off Can add People. Remove Access.
2. Share or Forward a Project in Messages
While you can forward or share any invitation link, the receiver can only access the file or become a collaborator, when the sharing permission is set to ‘Anyone with the link.’ Otherwise, they’ll receive the following message.
To forward the message link, long-press the project → choose More → select the project → tap the forward icon → add the contact.
To share, tap the person/group’s name (iPhone/iPad) or click the i icon (Mac) → scroll down to Collaboration → long-press or control-click the project → choose Share → add the contact.
Here, you can select new participants or re-share the project with the same group.
3. Add or Remove Participants to the Collaboration Group
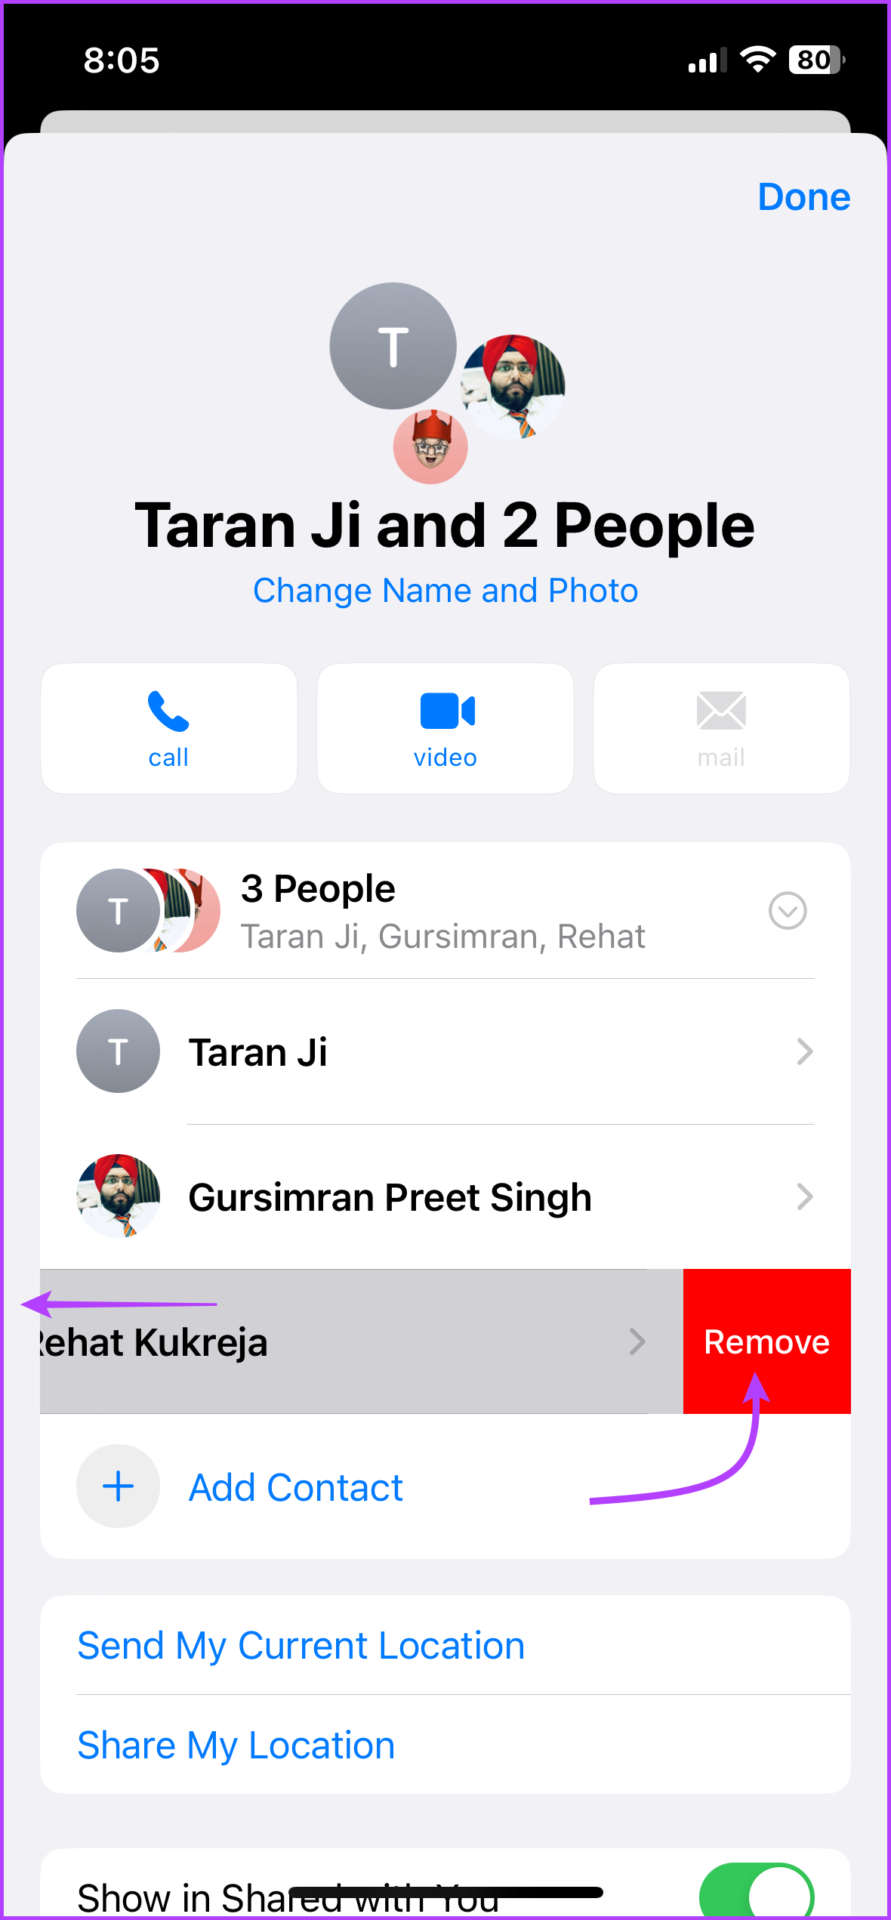
While you can add/remove participants from the message group, it just disconnects them from the messaging loop. You’ll need to manually add or remove their access from the project as shown above. I. On iPhone Tap the group name and then tap the > arrow next to the member’s info to open the collapsed menu.
To add a participant: Tap Add Contact → select the contact.
To remove a participant: Swipe left on the contact’s name → tap Remove → and then Remove again.
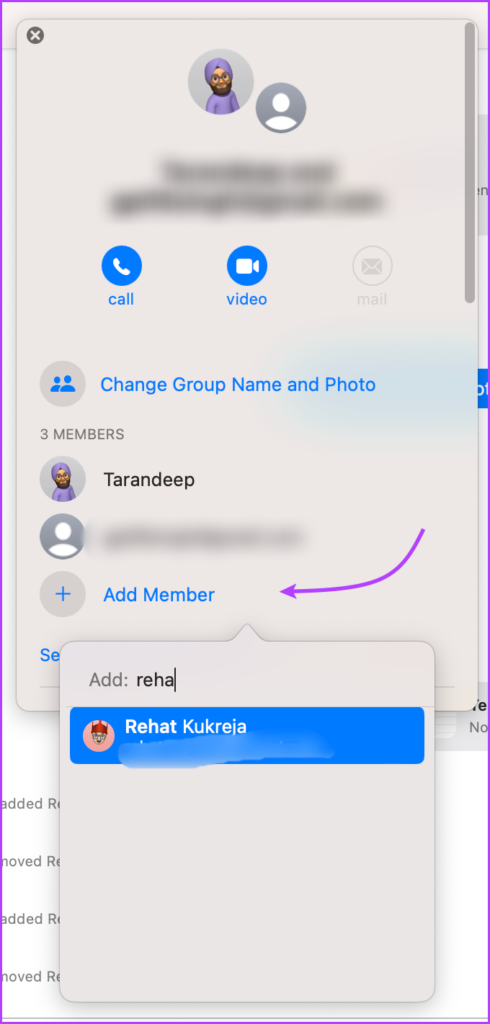
II. On Mac Click the i icon and go to the member’s section,
To add a participant: Click Add Member → choose the member.
To remove a participant: Control-click the participant’s name → Select Remove From Conversation.
How to Stop Collaborating on a Project in Messages
As mentioned above, while you can delete/unsend an invite, or remove the participant from the conversation, it won’t stop the collaboration. It would just end the iMessage notifications part of the collaboration. You can only stop collaborating or get rid of collaborators, through the corresponding app. That’s because Apple gives the app’s setting more precedence over the Messages settings. Here’s how to stop sharing on collaborative projects, Step 1: Open the project and tap the collaboration icon. Step 2: Tap/click Manage Shared File. Step 3: Here, tap/click Stop Sharing and select Stop Sharing again to confirm. After this, all the collaborators will be kicked out of the project and only you’ll be able to access or edit it.
How to Quit Collaboration in Messages
To stop message notifications for a collaboration, you’ll have to delete the invitation link or leave the conversation (if in a group). However, if you want to totally quit collaboration on a project, open the project → tap the collaboration icon → Manage Shared File → tap your name → select Remove Me → next, tap Continue to confirm the action.
Make the Most of Project Collaboration With Messages
Whether a team project, planning a vacation or making a shared grocery list, communication is the key. And Apple incorporates one of its most important communication tools, iMessage into the mix. Although the feature is limited as of now, we expect improvements in upcoming updates. What feature would you like to be included in the Collaborate on projects with Messages? Share your thoughts in the comments below.