Although this feature is enabled by default, you can take over and manually configure the amount of virtual memory available on your Windows PC. That’ll help you manage enough headroom for resource-heavy apps without throwing any memory-related errors. Read along as we explain everything about virtual memory, followed by the steps to configure it on your Windows 11 PC.
What Is Virtual Memory in Windows 11
When your PC runs out of available memory, it becomes sluggish or unresponsive. To tackle such situations, Windows includes a feature called virtual memory. It lets Windows temporarily offload some tasks from the RAM onto its storage drives to work as a swap or page file partition. That frees up space for running more tasks and programs. The page file created by virtual memory might be slower than RAM on your PC, Windows smartly prioritizes the tasks to be kept on the RAM and moves others to the page file. That creates additional room for memory that the demanding programs on your PC can utilize.
When Does One Need to Increase Virtual Memory
The virtual memory cannot be a substitute for physical memory. However, it is useful for short bursts of performance to run more programs on your PC It’s helpful when your computer has limited memory and multiple apps already run in the background. The performance you might get from increasing the virtual memory also depends on whether your PC has capable hardware – an HDD with more cache or a high-speed SSD (Solid State Drive) with sufficient storage capacity. Using a high-speed SSD compared to a mechanical HDD (Hard Disk Drive) ensures optimum performance gains from increasing the virtual memory on your Windows 11 PC. We recommend using SSDs because are much more reliable as they lack any moving parts than HDDs. Also, they offer way faster read and write speeds to help the virtual memory operate faster.
How to Increase Virtual Memory in Windows 11
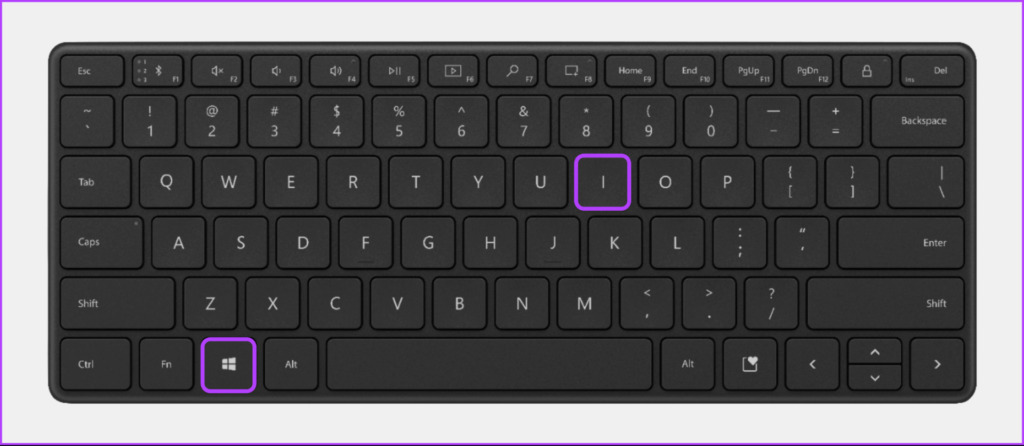
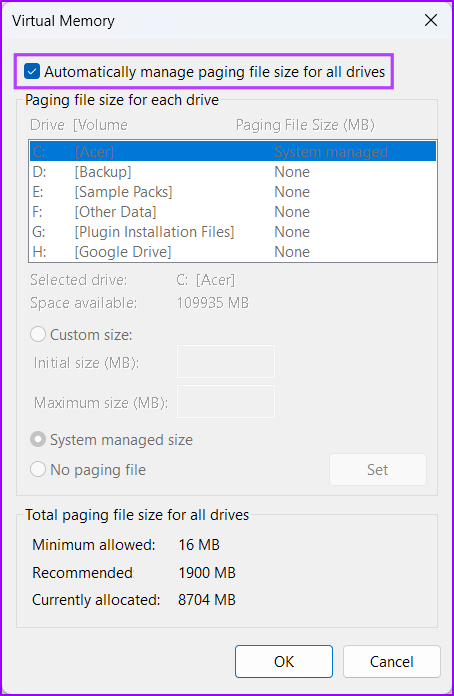
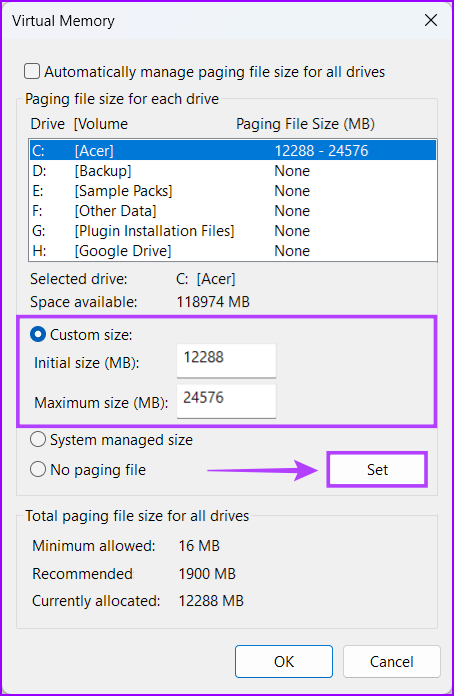
Increasing the virtual memory on your PC is a bit complex. You need to perform a couple of extra steps to configure and increase the amount of virtual memory on Windows, as detailed below: Step 1: Press the Windows + I keys to open the Settings app. Step 2: When the Settings app opens, scroll down and click on About. Step 3: Under the Device specifications section of the About page, click on Advanced system settings. Step 4: In the System Properties dialog, select the Advanced tab. Then click on the Settings button under the Performance section. Step 5: When a Performance Options dialog box appears, click on the Advanced tab again. Step 6: Click the Change button under the Virtual memory section. Step 7: When a Virtual Memory window appears on the screen, uncheck the ‘Automatically manage paging file size for all drives’ option by clicking on the check box. Step 8: Click on the Custom size option and specify the amount of drive storage you want to allocate towards virtual memory by typing a value in the Initial and Maximum size text boxes. Then click on Set to save the changes. The Initial and Maximum size corresponds to the minimum and maximum amount of storage capacity you can use as virtual memory in the form of a swap file. You can find the initial size by multiplying your PC’s RAM capacity in MBs by 1.5 times. At the same time, you can find the Maximum size by multiplying your current RAM capacity in MBs by 3 times. For instance if your PC has 8GB or 8 x 1024 = 8192MB (installed RAM x 1GB in MBs) of RAM. Then the initial size should be 8192MB x 1.5 = 12288MB. At the same time, the maximum size should be 8192MB x 3 = 24576MB. Step 9: After changing the Virtual Memory preferences, click on OK to close the window.
Improve Your PC’s Performance by Allocating More Virtual Memory
The virtual memory is a useful feature to temporarily allocate more usable memory to a particular program. It’s helpful when you have limited physical memory installed on your computer. While it’s helpful, ensure that you carefully calculate and assign appropriate proportions The above article may contain affiliate links which help support Guiding Tech. However, it does not affect our editorial integrity. The content remains unbiased and authentic.