In this post, we’ll show how to disable the login screen after sleep on Windows 11. So, without further ado, let’s get right to it.
1. Disable Login After Sleep From the Settings App
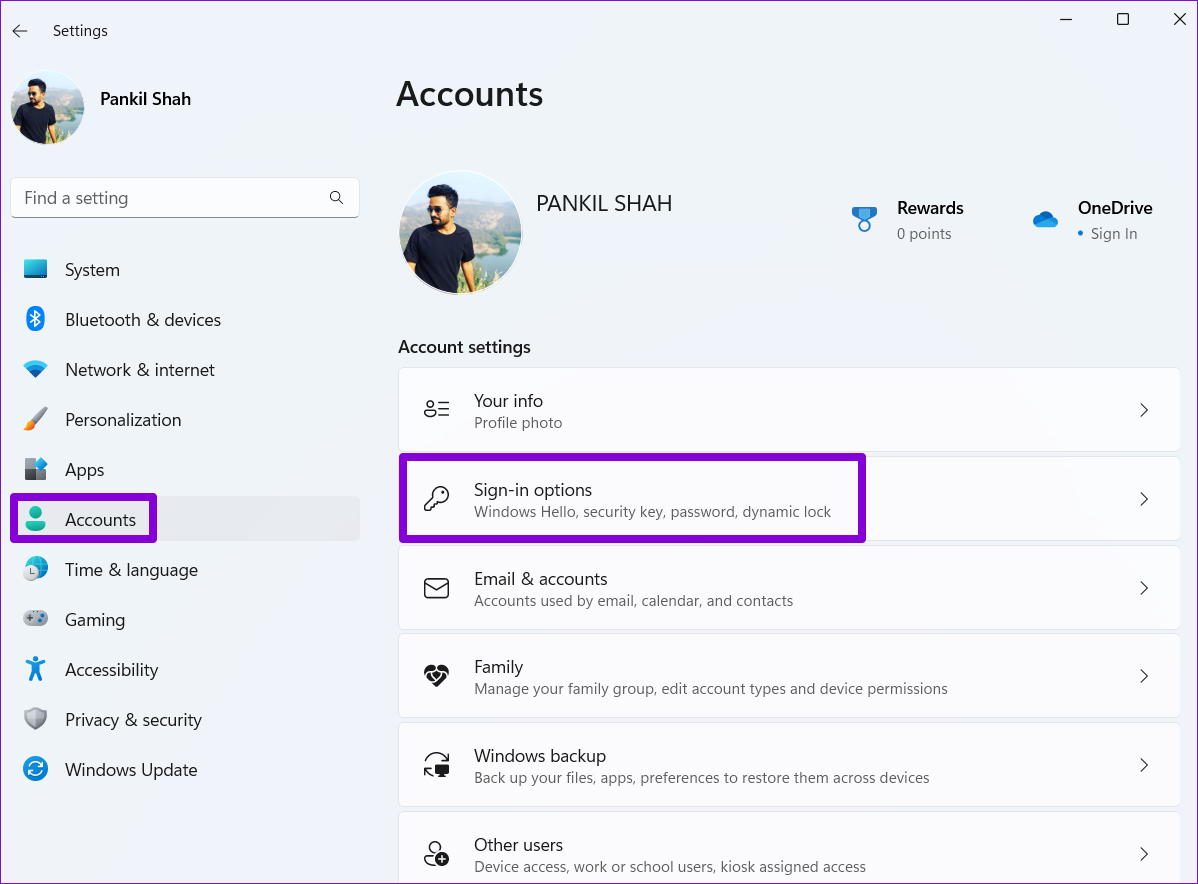
Let’s start with the easiest method first. You can use the Settings app on Windows to modify sign-in options and skip the login screen after sleep. Read on to learn how. Step 1: Press the Windows key + I to launch the Settings app. Step 2: Head over to the Accounts tab on your left and go to Sign-in options.
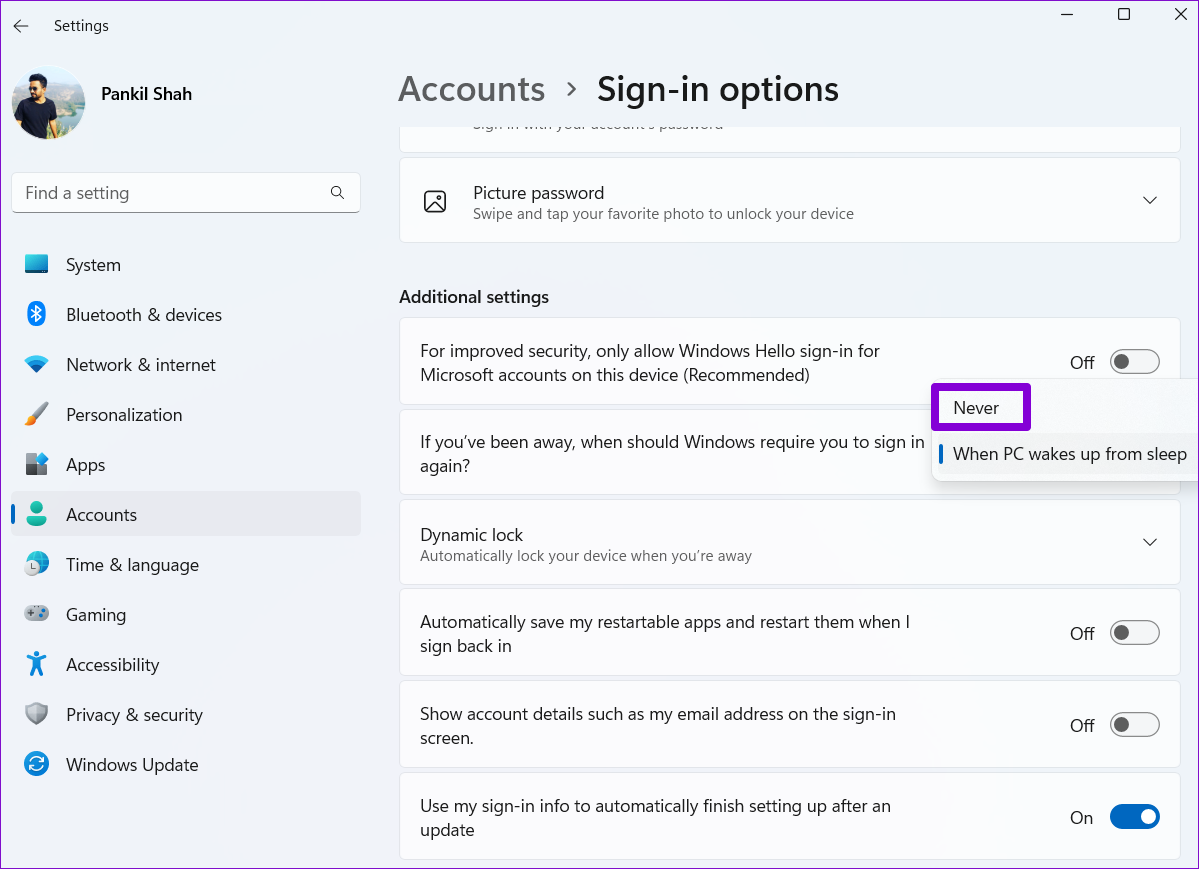
Step 3: Under Additional settings, use the drop-down menu next to ‘If you’ve been away, when should Windows require you to sign in again?’ and select Never.
That should do it. Windows will sign you in automatically when you wake your PC from sleep.
2. Disable Login After Sleep via Command Prompt
You can also use the command prompt on your PC to disable the login screen after you put your laptop to sleep. This method allows you to alter the said behavior according to your PC’s current power state of your Windows laptop. Read on to learn how. Step 1: Right-click on the Start menu and select Windows Terminal (Admin) from the list.
Step 2: Click on Yes when the User Account Control prompt appears.
Step 3: Run the following command to disable the login screen while your laptop is running on battery.
Step 4: Run the following command to disable the login screen while your laptop is plugged in.
Restart your PC to apply the changes. After that, Windows will no longer show the login screen when it wakes from sleep.
3. Disable Login After Sleep From the Registry Editor
Another way to disable login screen after you put your computer to sleep is by using a Registry Editor. Changing a particular registry keys incorporates a permanent change without tinkering any visible options. However, since the Registry Editor carries settings for Windows and its apps, you’ll need to create a backup of your registry files before making any changes. After creating a backup, use the following steps to avoid the sign-in screen after sleep. Step 1: Press the Windows key + R to launch the Run dialog. Type regedit in box and press Enter.
Step 2: Select Yes when the User Account Control prompt appears.
Step 3: In the Registry Editor window, copy and paste the following path the address bar.
Step 4: Right-click on the Desktop registry key, go to New and select DWORD (32-bit Value) from the sub-menu. Name it DelayLockInterval.
Step 5: Double-click on the newly created DelayLockInterval DWORD and change its Value data to 0 (zero).
Exit the Registry Editor window and reboot your PC to apply the change.
4. Disable Login After Sleep via Group Policy Editor
Alternatively, you can also use the Group Policy Editor to skip the password prompt after sleep on your Windows 11 laptop. However, Group Policy Editor is only available for Windows Pro, Enterprise, and Education editions. So, if you’re using Windows Home edition, you’ll have to use one of the methods mentioned above. Note that you must be signed in as an administrator to use this option on your laptop. Step 1: Press the Windows key + R to launch the Run dialog box. Type in gpedit.msc in the Open field and press Enter.
Step 2: In the Local Group Policy Editor window, use the left pane to navigate to the Sleep Settings folder. Here’s the address path:
Step 3: From the right pane, double-click the ‘Require a password when a computer wakes (plugged in)’ policy.
Step 4: Select Disabled and click on Apply.
Step 5: Next, double-click on the ‘Require a password when a computer wakes (on battery)’ policy.
Step 6: Select Disabled and hit Apply.
No More Prompts
The next time you wake your PC from sleep, you can resume your work without having to enter your password. Although disabling the login screen after sleep is convenient, it poses a risk to your computer’s privacy. Hence, you should only do this if it’s a personal computer and no one can access it physically without your permission. The above article may contain affiliate links which help support Guiding Tech. However, it does not affect our editorial integrity. The content remains unbiased and authentic.