The first obvious concern is whether it was created by someone else on your computer – that’s normal if you share your PC. However, there are several reasons that may lead to this problem. We have compiled a list of effective troubleshooting tips that will help.
1. Use an Administrator Account
A lack of proper permissions is one of the most common reasons you can’t change the read-only attribute of a folder. If the folder you’re trying to modify was created from an administrator account, you can’t do anything. If that’s the case, simply sign in with an administrator account and then change the read-only attribute from the folder’s properties.
2. Modify Permissions for the Drive
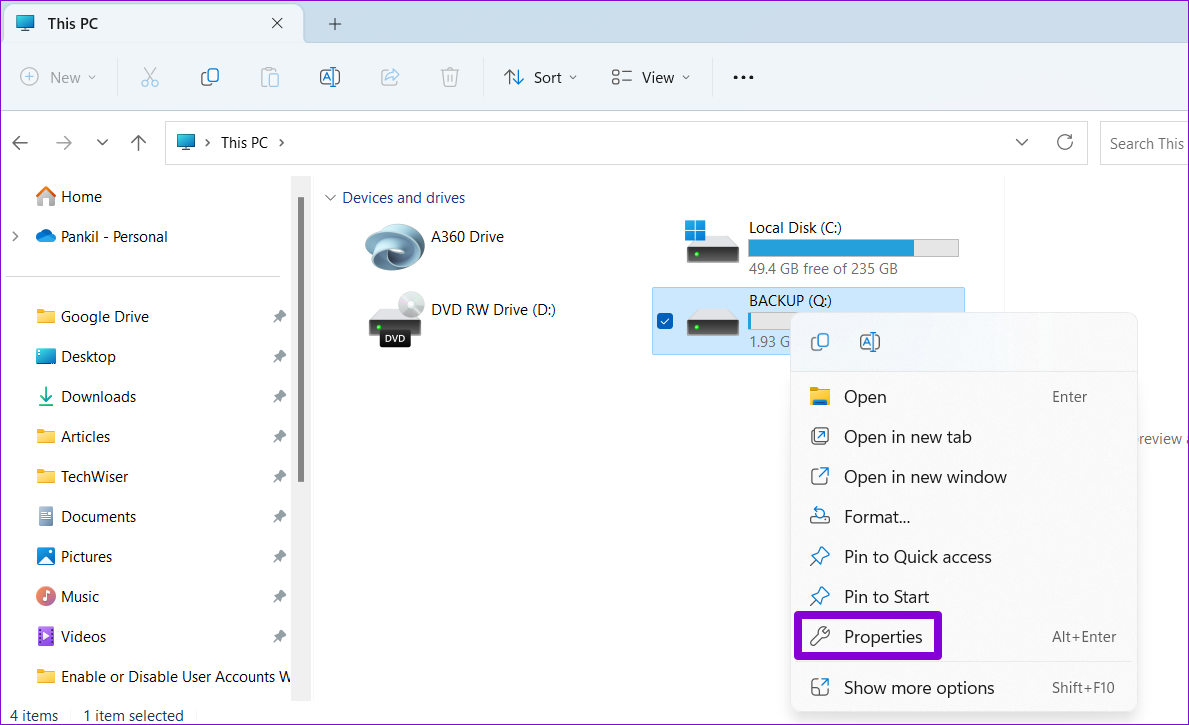
If the problem persists even after using an administrator account, you need to change the permissions for the drive where the folder is stored. Here’s how to do it. Step 1: Press the Windows key + E to open File Explorer and navigate to This PC. Step 2: Right-click on the drive where the folder is located and select Properties.
Step 3: Navigate to the Security tab and click the Advanced button.
Step 4: Click the Change permissions button.
Step 5: Select Yes when the User Account Control (UAC) prompt appears.
Step 6: Select your user account and click on Edit.
Step 7: Click the drop-down menu next to ‘Applies to’ and select ‘This folder, subfolders, and files.’
Step 8: Under Basic permissions, check the Full control box. Then, click OK.
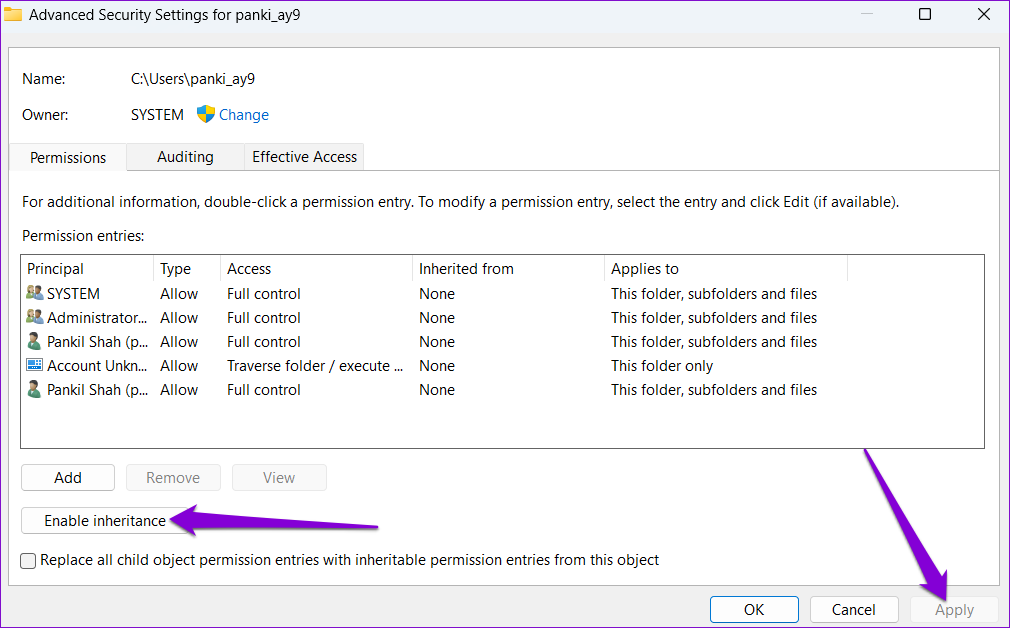
After you complete the above steps, you can change the folder attribute without problems. However, if there are multiple user accounts on the system, you’ll have to enable the inheritance option to ensure consistency of permissions across all objects. Step 1: Open File Explorer again and navigate to following folder: Step 2: Locate the folder with your username. Right-click on it and select Properties.
Step 3: Switch to the Security tab and click on Advanced.
Step 4: Click the Enable inheritance button and then hit Apply.
3. Change the Read-Only Attribute Using Command Prompt
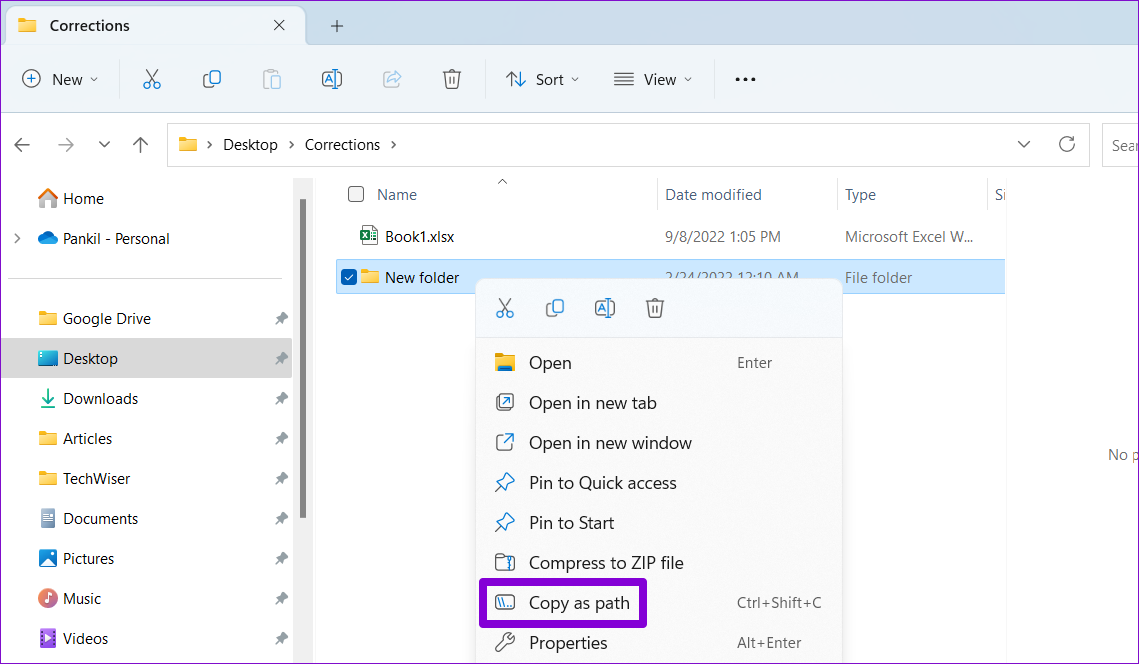
Windows provides several methods for changing the read-only attribute of a folder. So, if you’re having trouble changing the read-only attribute via folder properties, you can use Command Prompt to implement the change. Here’s how: Step 1: Right-click on the folder you want to change the read-only attribute and select ‘Copy as path.’
Step 2: Right-click on the Start icon and select Terminal (Admin) from the list.
Step 3: Select Yes when the User Account Control (UAC) prompt shows up.
Step 4: Paste the following command in the console and press Enter. Replace FolderPath in the above command with the path copied in the first step.
After that Windows will remove the read-only attribute for the folder.
4. Disable Controlled Folder Access
Controlled folder access is a security feature in Windows that protects your files and folders from unauthorized changes. This feature can also restrict you from changing the folder attribute on Windows 11. Here’s how you can disable it. Step 1: Click the search icon on the Taskbar, type windows security, and press Enter.
Step 2: Navigate to the ‘Virus & threat protection’ tab.
Step 3: Click on Manage ransomware protection.
Step 4: Toggle off the switch for Controlled folder access.
Make sure you re-enable the Controlled folder access after changing the folder attribute on Windows.
5. Run SFC and DISM Scans
Corrupt or damaged system files can also disrupt Windows operations and cause such problems. To check for this possibility, you can run the SFC (or System File Checker) scan on your PC by following the steps below. Step 1: Press the Windows key + S to open the search menu and type terminal in the box. Right-click on the first result and select Run as administrator.
Step 2: Select Yes when the User Account Control (UAC) prompt appears.
Step 3: Type the following command in the console and press Enter.
After the scan is complete, a message will appear indicating whether or not it found any problems. You’ll also get instructions to fix errors if there is a problem. Next, you need to run the DISM (Deployment Image Servicing and Management) scan. Similar to the SFC scan, DISM can repair system images and files on a Windows computer. Launch the command prompt with admin rights, run the following commands individually, and press Enter after each command:
Restart your PC after the scan is complete and try changing the folder attribute again.
Manage Your Folders With Ease
When a folder keeps reverting to read-only, you may have difficulty modifying any subfolders or files. Hopefully, one of the solutions above help you fix any underlying issues, and remove the read-only attribute for your folder for good. The above article may contain affiliate links which help support Guiding Tech. However, it does not affect our editorial integrity. The content remains unbiased and authentic.