Checking the Wi-Fi signal strength should be your first step if you’re experiencing slow internet speeds or frequent network disconnections on Windows. This post has 6 different methods for determining the Wi-Fi signal strength on your Windows 11 computer.
1. Check Wi-Fi Signal Strength From the Taskbar
The quickest way to determine Wi-Fi signal strength on Windows is through the Taskbar. Locate the Wi-Fi icon on bottom-right corner of the Taskbar and check the signal strength of your network connection. The greater the number of solid curved bars, the stronger the signal.
If you want to check the Wi-Fi signal strength of other nearby networks, press the Windows key + A to open the Quick Settings panel and click the sideways arrow next to the Wi-Fi icon.
You’ll see a list of nearby Wi-Fi networks and their signal strength.
2. Check Wi-Fi Signal Strength From the Settings App
The Windows 11 Settings app makes it easy to add, remove, and manage Wi-Fi networks from one place. It also provides information regarding Wi-Fi signal strength. Here’s how to check. Step 1: Open the Start menu and click the gear icon to launch the Settings app.
Step 2: Select Network & internet from the left sidebar. Then, click on Wi-Fi in the right pane.
Step 3: The Wi-Fi icon on the left of your network’s name indicates the signal strength.
Step 4: You can click on ‘Show available networks’ to view the signal strength of other nearby Wi-Fi networks.
3. Check Wi-Fi Signal Strength Using Control Panel
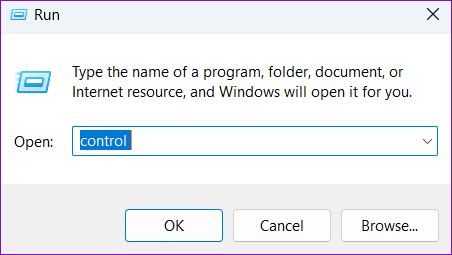
Those comfortable using the Control Panel over the Settings app can employ the following steps to check the Wi-Fi signal strength on Windows 11. Step 1: Press the Windows key + R to open the Run command. Step 2: Type control in the Open field and press Enter.
Step 3: Use the drop-down menu in the top right corner to change the view type to Large icons. Then, go to ‘Network and Sharing Center.’
Step 4: The wireless icon next to Connections shows the signal strength of your Wi-Fi connection.
4. Check Wi-Fi Signal Strength Using Task Manager
The Windows Task Manager can provide a wealth of information about your system. You can also use it to check the signal strength of your current Wi-Fi connection. Here’s how to do it. Step 1: Press Ctrl + Shift + Esc on your keyboard to open the Task Manager. Step 2: Use the left pane to switch to the Performance tab.
Step 3: Click on Wi-Fi and check the current signal strength at the bottom.
5. Check Wi-Fi Signal Strength Using Command Prompt
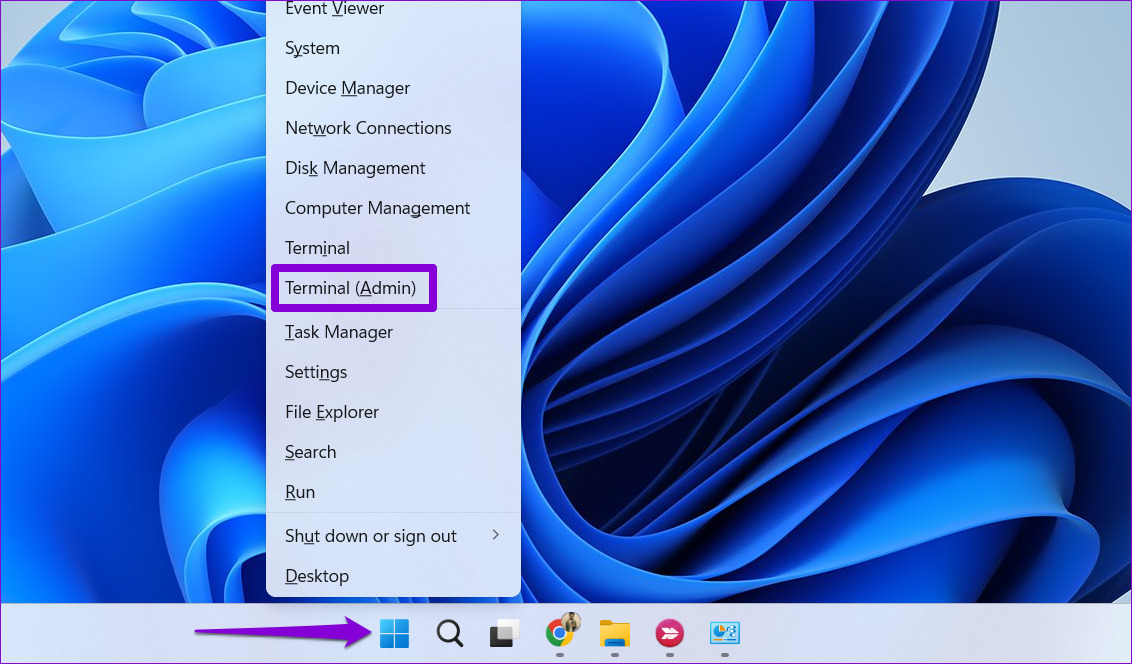
Not a fan of GUI? No problem. Windows also lets you check the Wi-Fi signal strength by running a command in Command Prompt. Unlike the previous methods, Command Prompt provides an accurate measurement of Wi-Fi signal strength. To check Wi-Fi signal strength using Command Prompt: Step 1: Right-click on the Start icon and select Terminal (Admin) from the list.
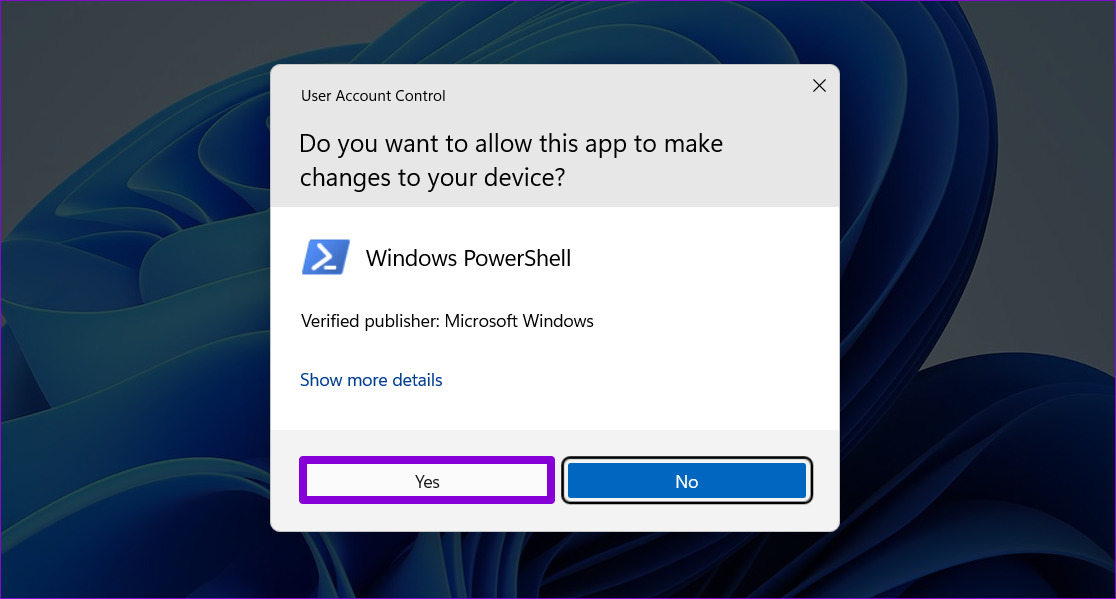
Step 2: Select Yes when the User Account Control (UAC) prompt appears.
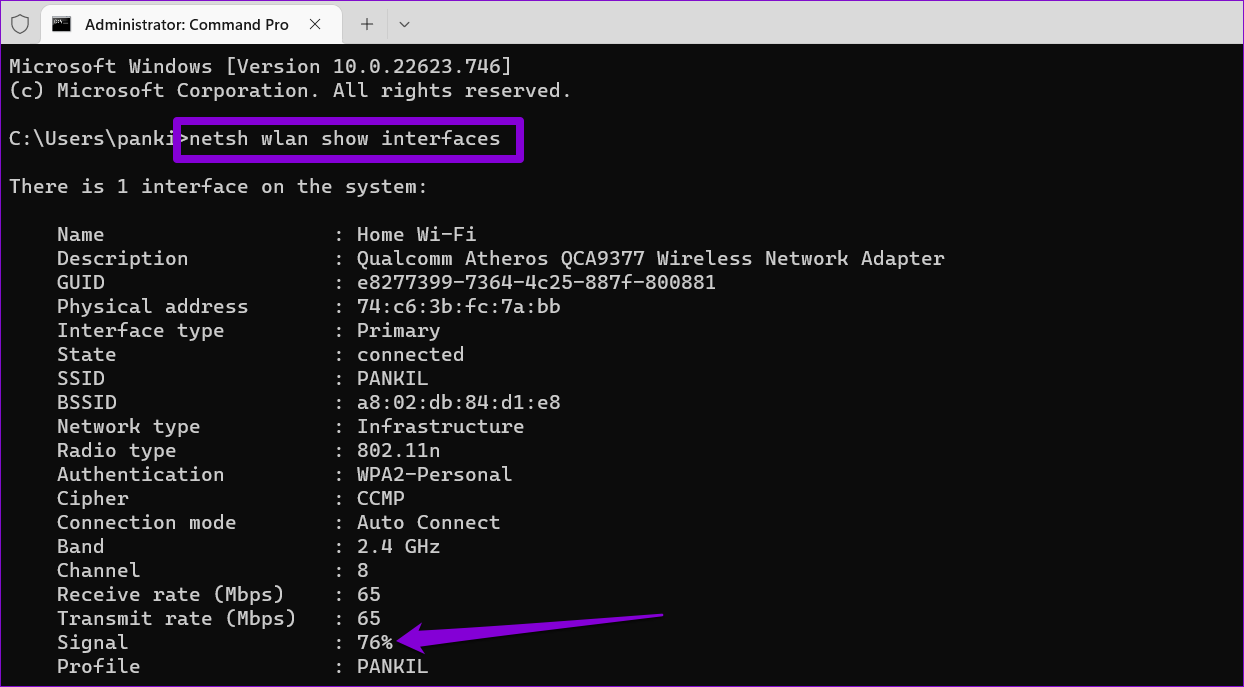
Step 3: In the console, run the following command and press Enter. The command will reveal all the information about your Wi-Fi connection, including the signal strength. Step 4: You can check the Wi-Fi signal strength in the Signal field.
6. Check Wi-Fi Signal Strength Using Windows PowerShell
Like Command Prompt, Windows PowerShell can also reveal the signal strength of your Wi-Fi connection. Here are the steps you can follow. Step 1: Click the search icon on the Taskbar or use the Windows key + S keyboard shortcut to open the Search menu. Type Windows PowerShell in the search box, and select Run as Administrator.
Step 2: When the User Account Control prompt appears, select Yes to continue.
Step 3: Paste the following command in the PowerShell window and press Enter. PowerShell will return the value of the Wi-Fi signal strength in terms of percentage.
Free Internet, Feel Free
Surveying the Wi-Fi signal strength on your Windows computer can help you fix the niggles. If the signal quality is weak, your Windows computer might disconnect from the Wi-Fi network frequently. Thankfully, there’s a lot you can do to boost the strength of your Wi-Fi signal. While we only discussed Windows 11 in this post, you can also use the above methods to check the Wi-Fi signal strength on Windows 10. The above article may contain affiliate links which help support Guiding Tech. However, it does not affect our editorial integrity. The content remains unbiased and authentic.