Several causes ranging from temporary router glitches to malfunctioning network drivers, can trigger this error. If you cannot pinpoint the exact cause, we have compiled some solid methods below to help fix the error message on your Windows 11 computer.
1. Restart Your Router
Rebooting your router is a good idea, since we barely do that often. There’s a chance that the router has an old cache or settings, and a simple restart should purge those details to make way for new ones. Turn off your Wi-Fi router and unplug it from the power source. Wait about a minute, plug the router back into the power source and turn it on.
2. Set IP Address Settings to Automatic
Such issues may arise if you recently modified your PC’s wireless network adapter with a custom IP address. To fix this, you should configure Windows to acquire an IP address automatically by following the steps below. Step 1: Press the Windows key + R to open the Run dialog box. Type control in the box and press Enter to open the Control Panel.
Step 2: Use the drop-down menu in the top right corner to change the view type to small or large icons and go to Network and Sharing Center.
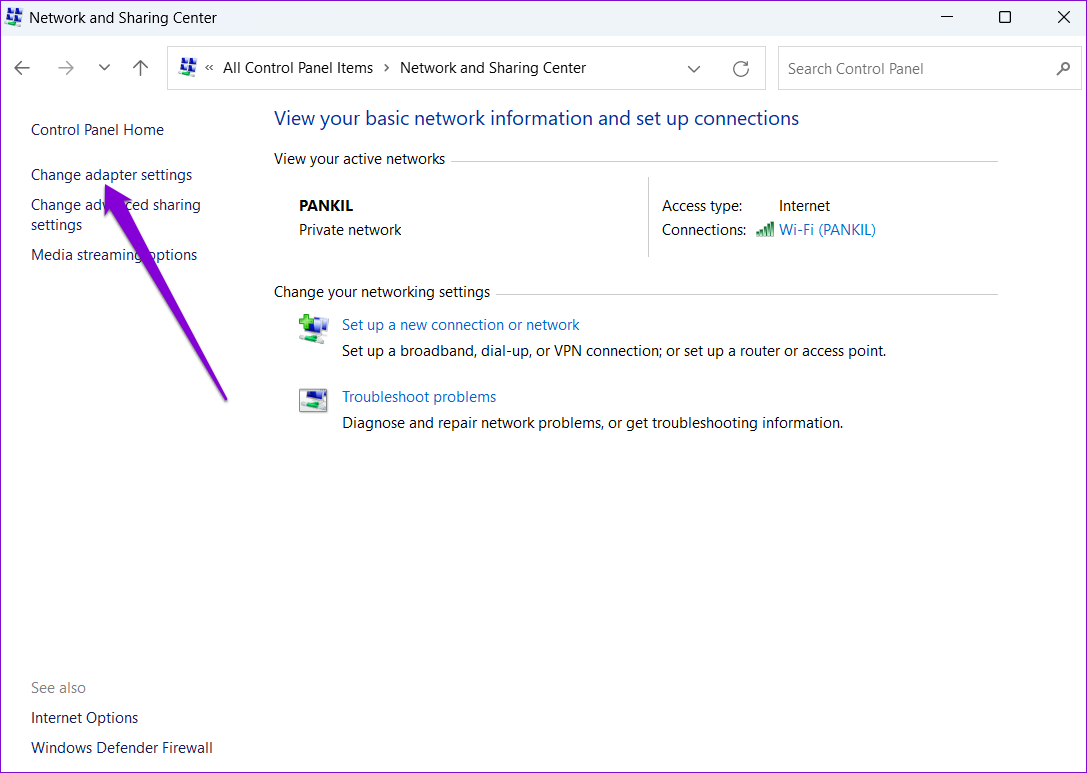
Step 3: Click on the ‘Change adapter settings’ option on the left column.
Step 4: Right-click on your Wi-Fi network adapter and select Properties.
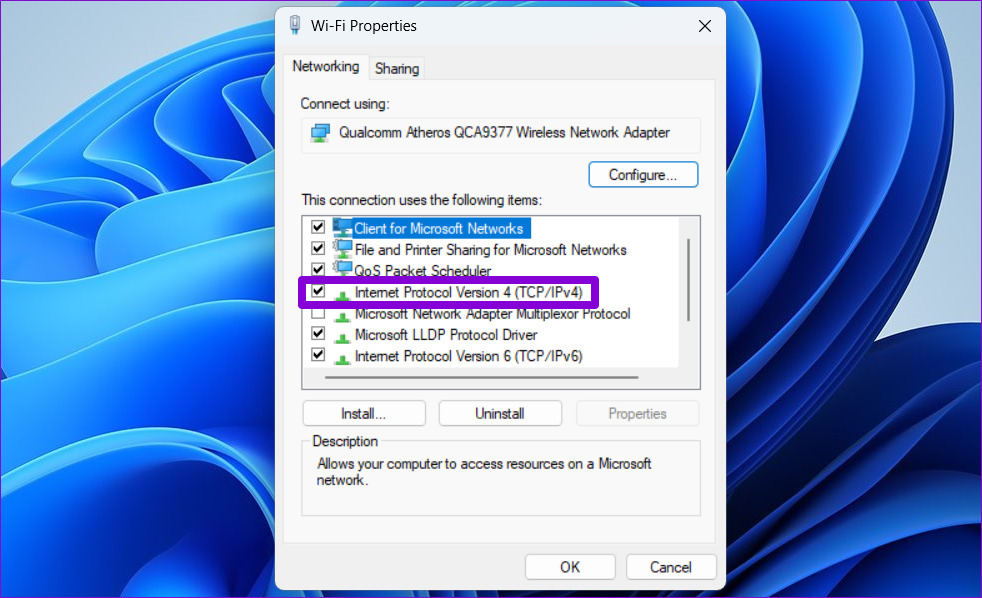
Based on your User Account Control (UAC) settings, if the UAC appears, select Yes. Step 5: When the Wi-Fi Properties window opens, double-click on ‘Internet Protocol Version 4 (TCP/IPv4)’ to open its Properties.
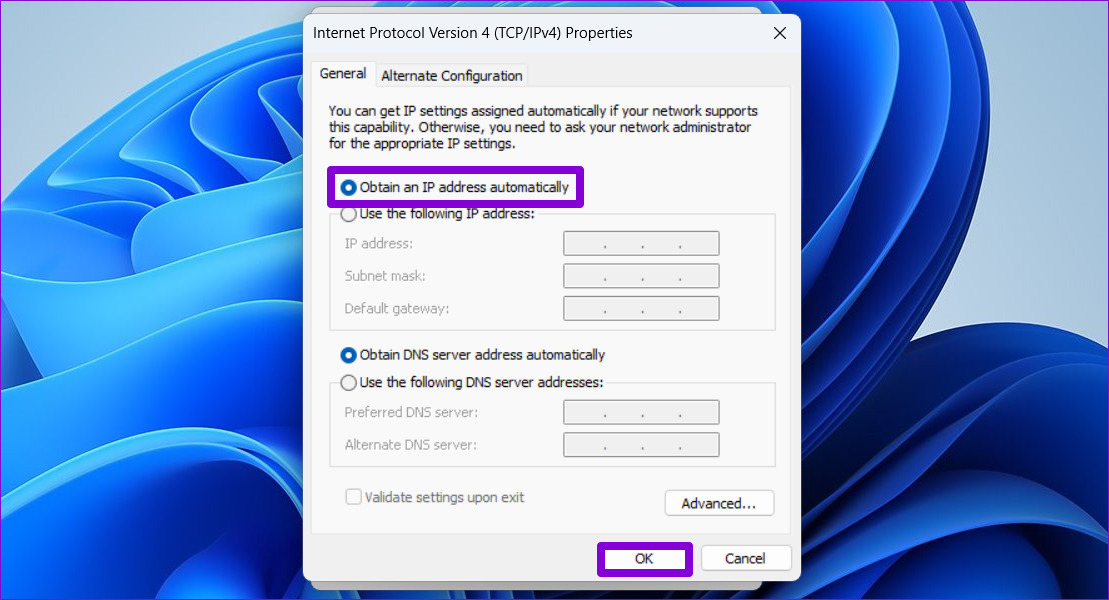
Step 6: Select ‘Obtain an IP address automatically’ and click OK.
Similarly, select ‘Obtain an IPv6 address automatically’ for ‘Internet Protocol Version 6 (TCP/IPv6).’
3. Restart WLAN AutoConfig Service
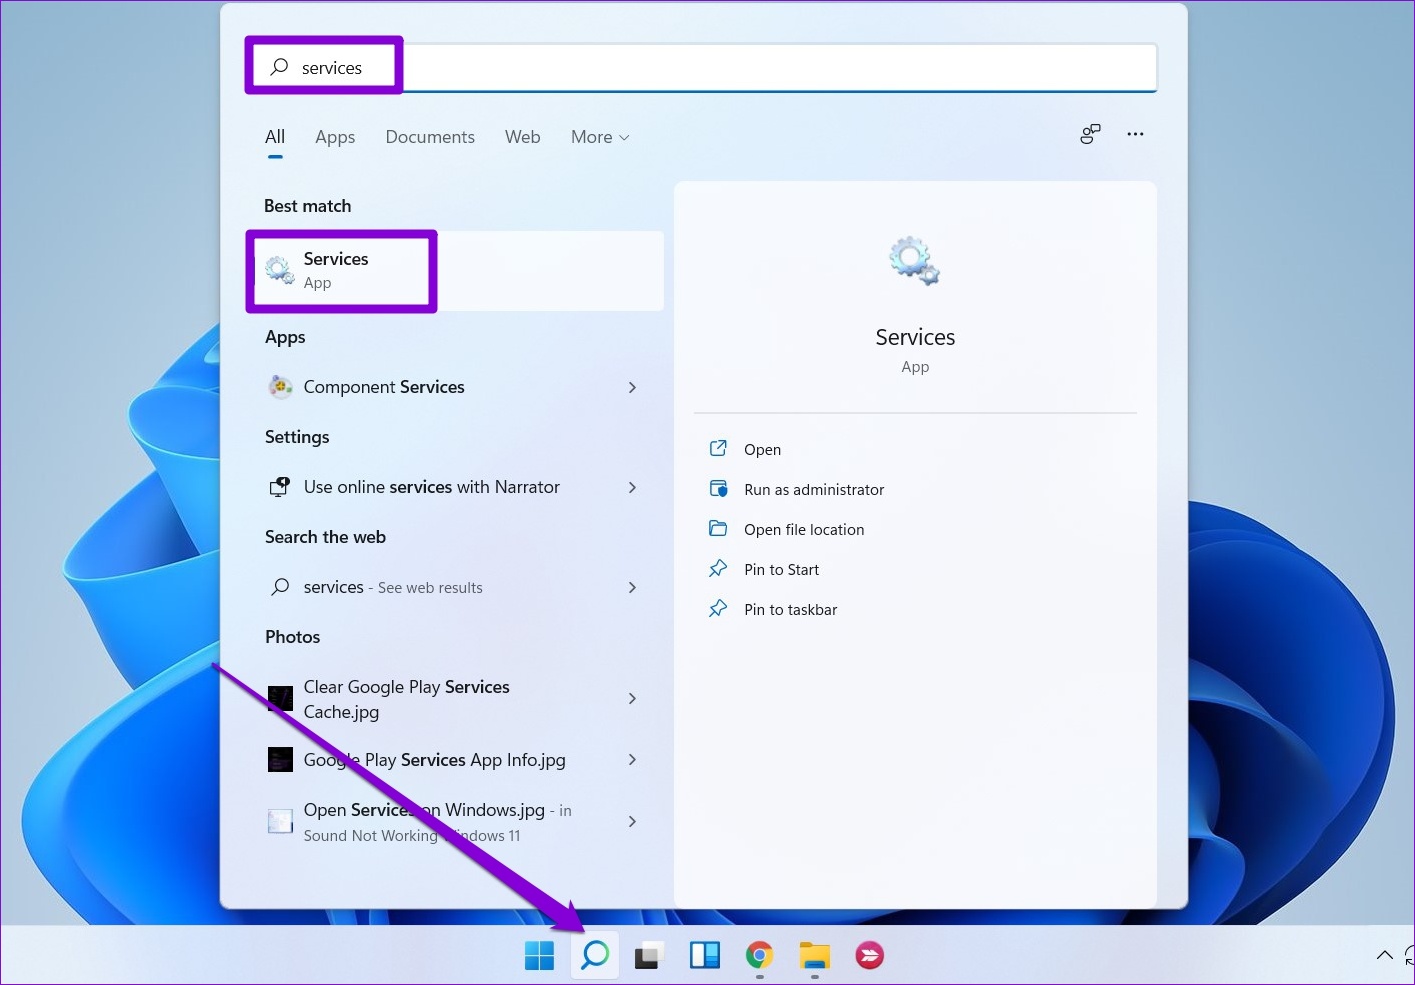
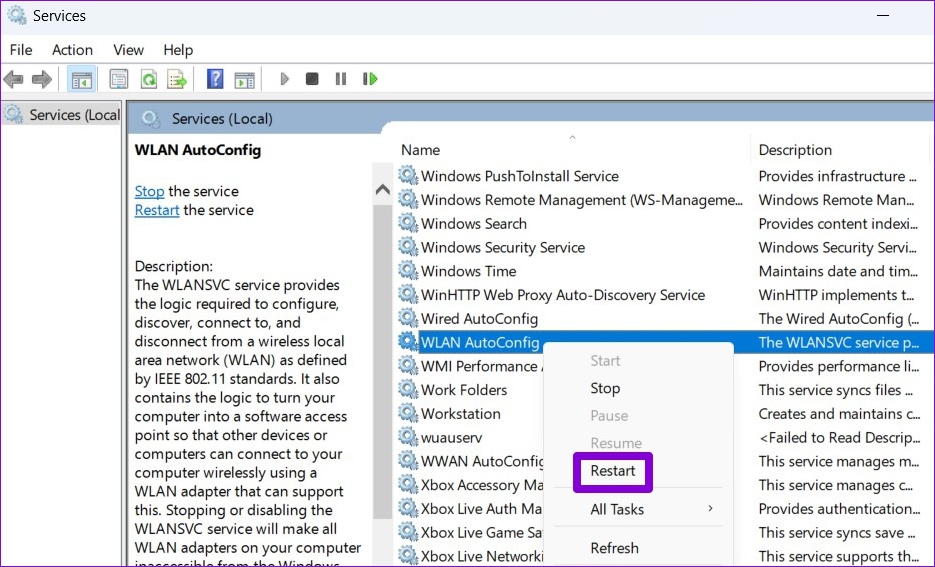
Windows uses the WLAN AutoConfig service to facilitate the connection with your Wi-Fi network. So when this service encounters a problem, Windows may display the ‘Wi-Fi does not have a valid IP configuration’ error. Here’s how you can restart the service to remedy a temporary glitch. Step 1: Click the search icon on the Taskbar, type services, and select the first result that appears.
Step 2: Scroll down to locate the WLAN AutoConfig service. Right-click on it and select Restart.
After this, see if your PC can connect to the internet without any issues.
4. Renew Your IP Address and Flush DNS Cache
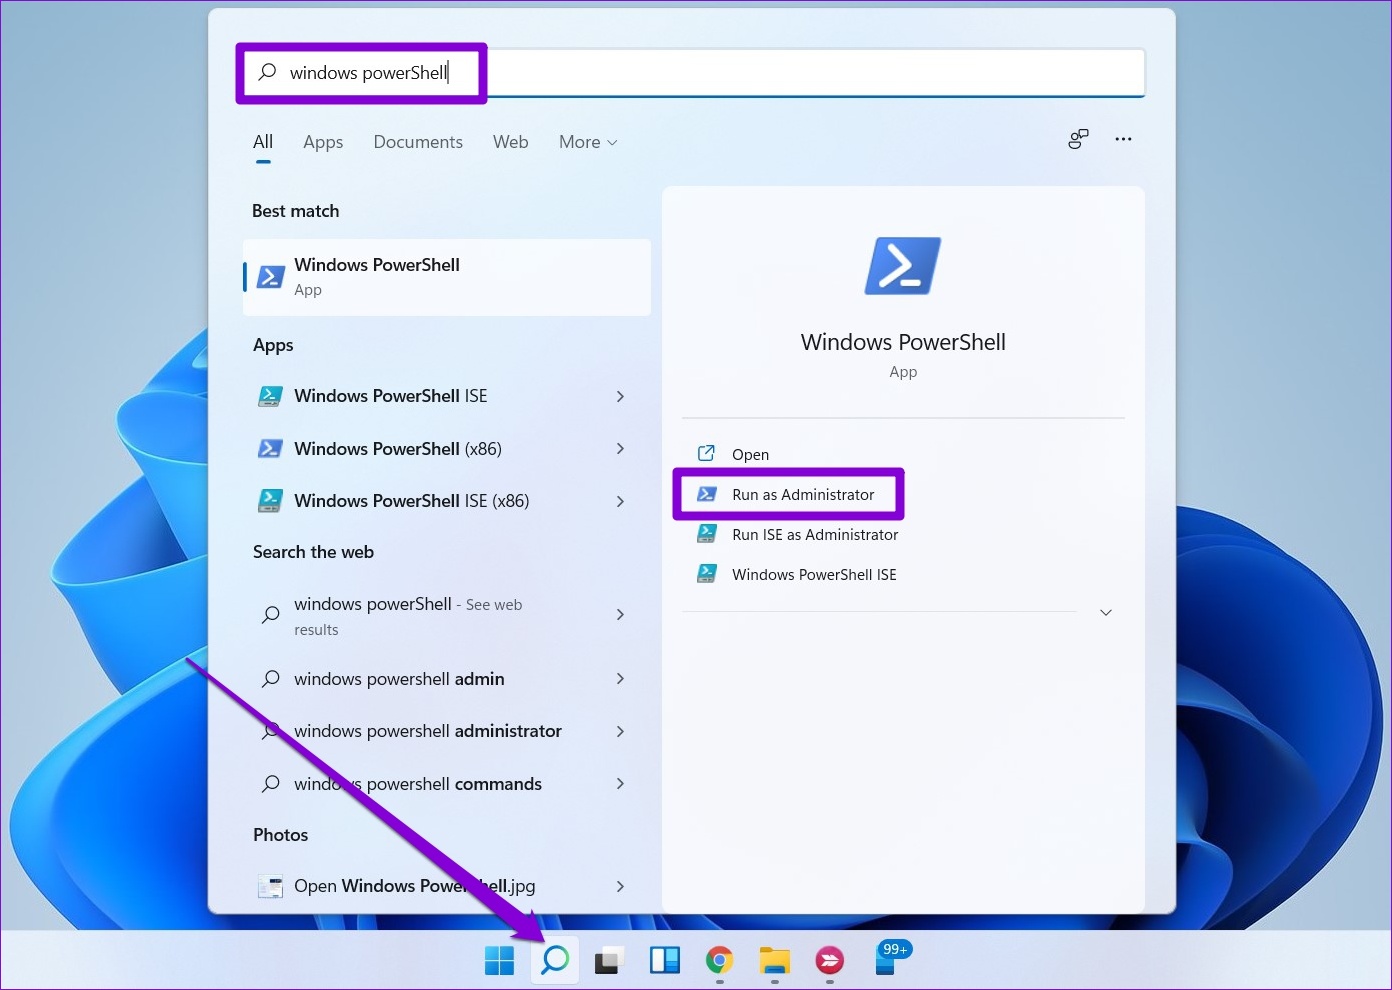
One of the ways to solve the invalid IP configuration error is to assign a new IP to your computer. You can force Windows to acquire a new IP address from the router and flush the DNS cache with a few commands in Windows PowerShell. You may run the same commands in the Command Prompt too. Step 1: Press the Windows key + S to open the search menu. Type Windows PowerShell and select Run as administrator.
Step 2: Run the following commands one by one.
After running the above commands, check if Windows can connect to the network.
5. Reset TCP/IP
Windows uses the Transmission Control Protocol and Internet Protocol (or TCP/IP) to communicate with other machines on the network and the internet for transmitting and receiving digital data. So resetting the TCP/IP stack can remove any glitch to fix the invalid IP configuration issue on Windows. Step 1: Right-click on the Start icon and select Terminal (Admin) from the list.
Step 2: Run the following commands in the console and press Enter after each one:
Restart your PC and check if the ‘Wi-Fi doesn’t have a valid IP configuration’ error occurs again.
6. Disable and Enable Network Adapter
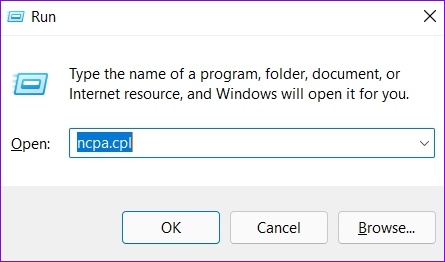
Issues with your PC’s wireless network adapter can also give rise to such errors. You can try disabling and re-enabling the network adapter to see if that improves the situation. Step 1: Press the Windows key + R to open the Run dialog. Type ncpa.cpl in the Open field and press Enter.
Step 2: In the Network Connections window, right-click on the network adapter and select Disable. When a User Account Control prompt appears, select Yes.
Wait for at least 10 seconds, then right-click on the network adapter and enable it again.
7. Update Network Drivers
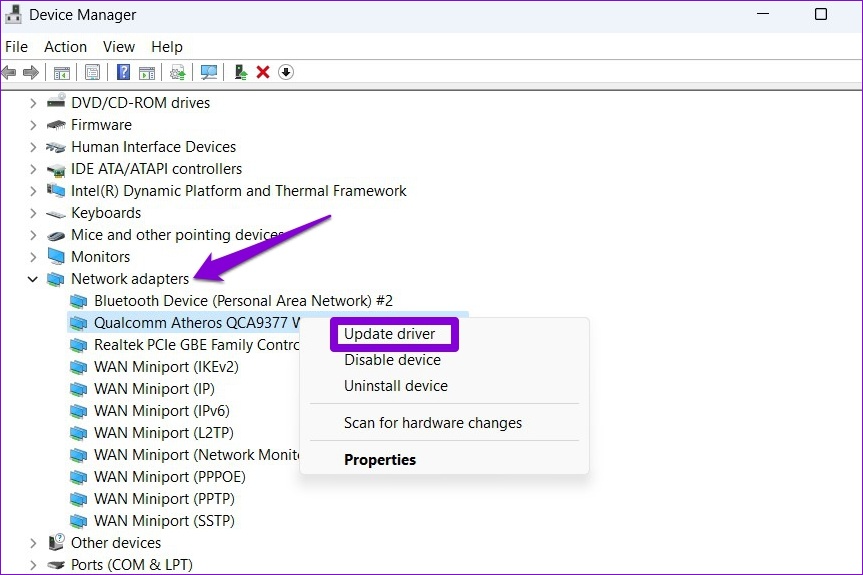
Drivers typically don’t cause a lot of trouble after you install them. But if they’re outdated or some software messes with them, you may encounter such errors. Similarly, you can update the network drivers on your Windows 11 PC. Step 1: Right-click on the Start icon and select Device Manager from the list.
Step 2: Double-click on Network adapters to expand it. Right-click your network adapter and select Update driver.
From there, follow the on-screen instructions to finish updating the network driver. Restart your PC after this and check if the issue is still there.
8. Reset Network Settings
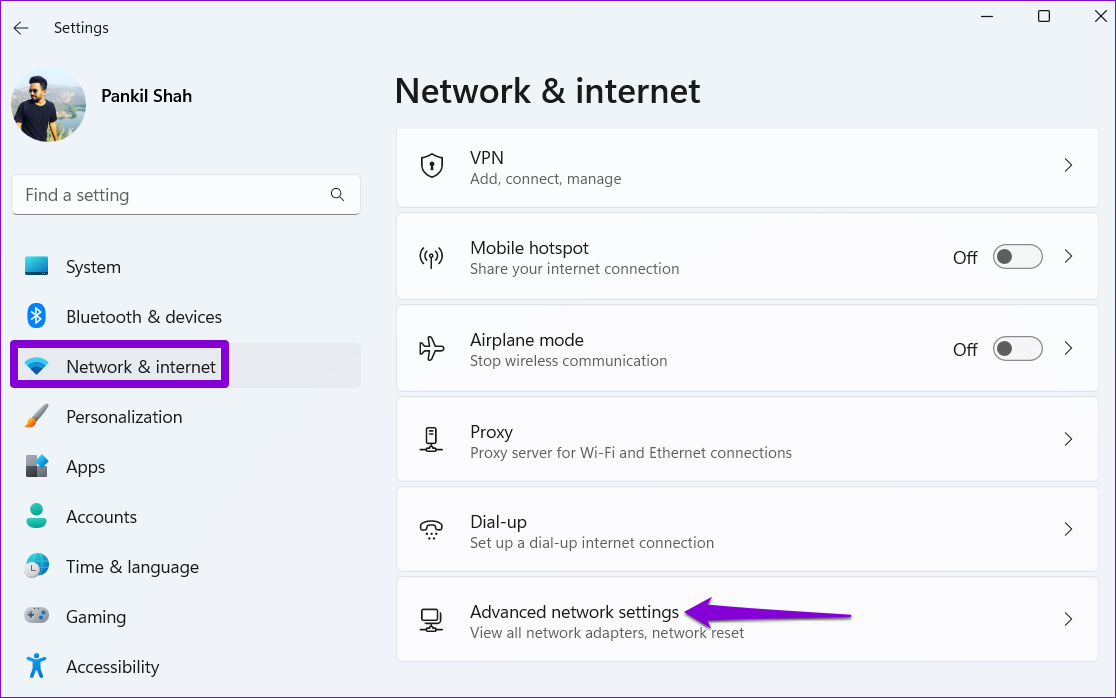
You can reset your PC’s network settings as the last resort. That means you’ll lose all the network configurations, like the IP address and DNS server settings that you enter to let your PC connect with your network. Of course, you’ll have to enter it again. Here’s how to reset Network Settings on Windows. Step 1: Press Windows key + I to launch the Settings app. Navigate to the Network & internet tab and click on Advanced network settings.
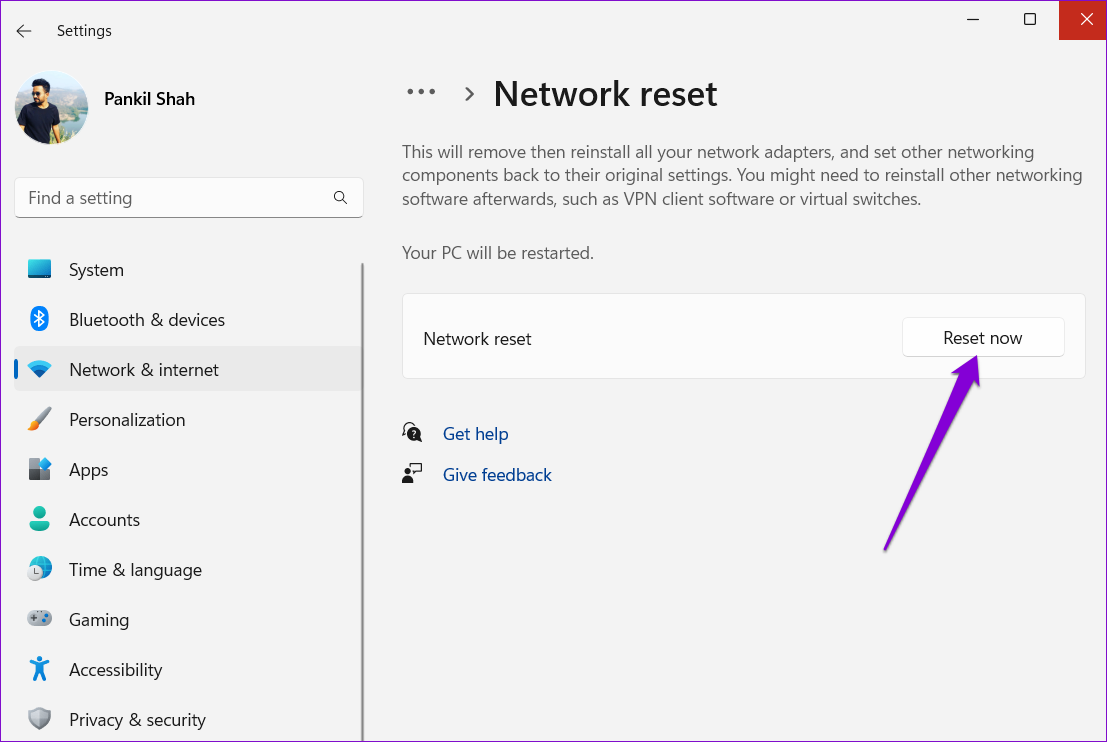
Step 2: Under More settings, click on Network reset.
Step 3: Click the Reset now button next to Network reset.
Your PC will restart and revert to the default network settings. After that, you’ll have to manually enter the IP address details or let it capture the IP address details from your network automatically.
Say Hello to the Internet
Wi-Fi problems are the worst. Such internet issues can impact your productivity and also stop you from enjoying the entertainment through streaming services and games. That said, applying the above fixes should help you fix the ‘Wi-Fi doesn’t have a valid IP configuration’ error on Windows and get you back online. The above article may contain affiliate links which help support Guiding Tech. However, it does not affect our editorial integrity. The content remains unbiased and authentic.
